Pie Crust
Single Crust | Double Crust | Crumb Crust | Blind Baking | Decorative Tops
Decorative Edges | Tips
Making your own pie crust may seem like a challenge but with the right advice and techniques you can master making crust with just a little practice. The tender, flaky crust that you create will be worth the effort. Some tips that will help make the process successful are shown below.
- Be sure the butter or margarine is cold when you start mixing it with the flour.
- When adding water to moisten the flour and butter mixture, be sure the water is ice cold.
- Work on a cool surface if possible and be sure the kitchen is cool. Avoid making crust on a hot day unless the room is air-conditioned.
- Do not overwork the dough and work as quickly as possible.
- Chill the dough before baking.
- A metal or unglazed ceramic pie plate is the best type of pan to use.
Single Crust
Ingredients:
1 1/4 cups all-purpose flour
1/4 tsp. salt
2 tbsp. shortening (chilled) |
|
4 tbsp. cold butter or margarine (cut in 1/4 inch slices)
3 to 5 tbsp. ice water |
Mixing the Ingredients
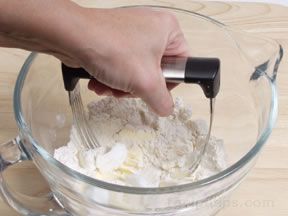
- In a large bowl, mix the flour and salt together. Using a pastry blender, cut in the chilled shortening and butter (or margarine).
|
|
|
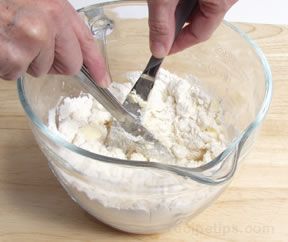
- An alternative method to using a pastry blender for cutting in butter (or margarine) is using two knives to scissor cut the ingredients.
|
|
|
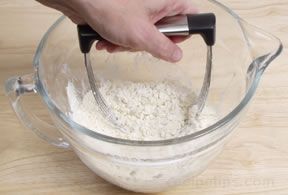
- Work the mixture only until it forms coarse crumbs that resemble tiny split peas.
|
|
|
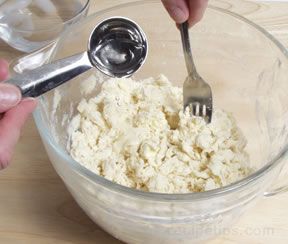
- Sprinkle the flour and fat mixture with 3 tbsp. of ice water and gently mix together using a fork. If the dough seems dry, add more ice water, one tablespoon at a time.
|
|
|
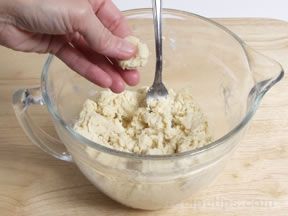
- Only add enough water to make the dough hold together. Mix quickly and gently. Test the dough by pinching a small piece of dough between your fingers. If it holds together you have added enough water.
|
|
|
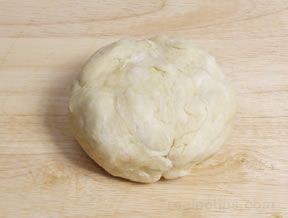
- Gather the dough and form a ball but be careful that you do not overwork the dough.
|
|
 |
Some recipes indicate that the dough should be wrapped in plastic and refrigerated for 30 minutes before rolling it out. Others state that chilling the dough at this point is not necessary. You may have to experiment with this to see what works best for you.
Rolling the Pie Crust
|
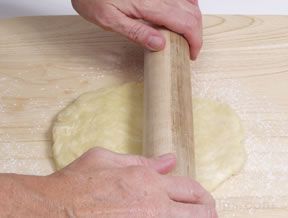
- Flatten the ball of dough into a 4 to 6 inch disc and place on a cool, lightly floured surface. The dough can also be rolled between two pieces of wax paper or rolled out on a pastry cloth.
- Starting in the center of the flattened disc, roll outwards.
|
|
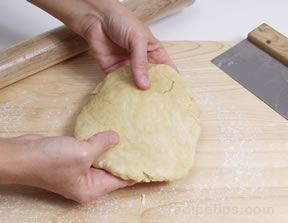
- With every couple of rolls, turn the dough a quarter of a turn to produce a round uniform crust.
|
- Instead of picking the roll up after every few rolls, you can rotate your rolling angle. Always start in the middle and roll out, but rotate about 45° with each roll until you have moved all around the dough. Continue to roll in the same pattern until the dough is the desired size and thickness. Be sure to check frequently to see if the dough is sticking to the surface.
|
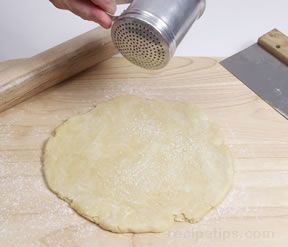
- Sprinkle the dough lightly with flour when it shows signs of sticking. Only add flour when necessary.
|
|
|
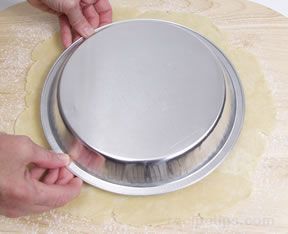
- Roll crust to approximately 1/8 inch in thickness and 2 inch in diameter larger than an inverted 9-inch pie plate.
|
|
|
|
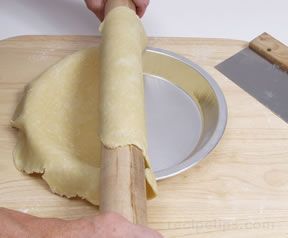
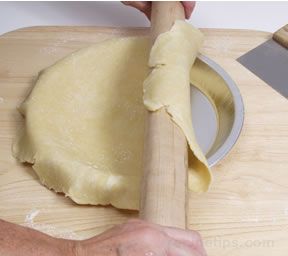
- To transfer the crust to the pie plate, partially wrap the crust around the rolling pin and gently lift the crust onto the pie plate, being careful to get it centered over the plate and not stretch the dough.
|
|
- Once it is in place, unroll the crust from the rolling pin.
|
|
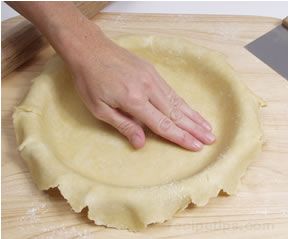
- Gently press the crust against the bottom and sides of the pie plate.
|
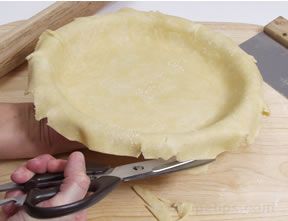
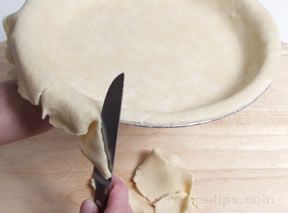
- Trim the overhang to about 1 inch. If saving the trimmings for decorating the pie, wrap them in plastic and refrigerate until ready to use.
|
|
|
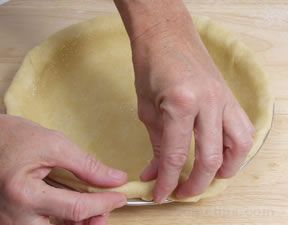
- Fold the overhang under so that it is flush with the rim of the pie plate.
|
|
|
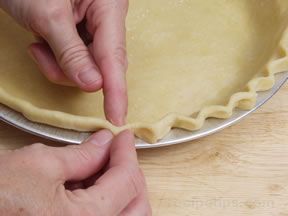
- Flute the edge to finish it. Place the finished crust in the refrigerator for 30 minutes before baking or filling.
|
|
 |
|
Note:
- If the crust tears or gets a hole in it when you transfer it to the pie plate, the crust can be repaired. Make a patch with a scrap piece of dough. Shape the dough to fit the tear and moisten its edges. Also moisten the edges of the the hole.
- Cover the damaged area with the patch and gently press in place.
|
 |
Double Crust
Ingredients:
2 1/4 cups all-purpose flour
1/2 tsp. salt
1/4 cup shortening (chilled) |
|
1/2 cup cold butter or margarine (cut in 1/4 inch slices)
6 to 8 tbsp. ice water |
Mixing the Ingredients
- In a large bowl, mix the flour and salt together. Using a pastry blender or two knives, cut in the chilled shortening and butter (or margarine). Work the mixture only until it forms coarse crumbs that resemble tiny split peas. See Single Crust.
- Sprinkle the flour and fat mixture with 4 tbsp. of ice water and gently mix together. If the dough seems dry, add more ice water, one tablespoon at a time. Only add enough water to make the dough hold together. Test the dough by pinching a small piece of dough between your fingers. If it holds together you have added enough water. Mix quickly and gently. See Single Crust.
Rolling the Pie Crust
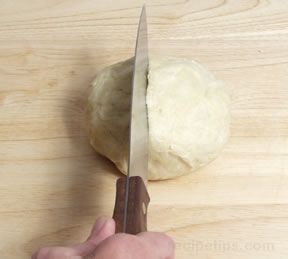
- Gather the dough and cut in two to form two balls, one being slightly larger than the other. Be careful that you do not overwork the dough.
|
|
|
- Flatten the larger ball of dough into a 4 to 6 inch disc and place on a cool, lightly floured surface. The dough can also be rolled between two pieces of wax paper or rolled out on a pastry cloth. Place the other ball of dough in the refrigerator until it is needed.
- Starting in the center of the flattened disc, roll outwards. With every couple of rolls, turn the dough a quarter of a turn to produce a round uniform crust.
See Single Crust.
- Sprinkle the dough lightly with flour when it shows signs of sticking. Only add flour when necessary.
- Roll crust to approximately 1/8 inch in thickness and 2 inch in diameter larger than an inverted 9-inch pie plate.
See Single Crust.
- To transfer the crust to the pie plate, partially wrap the crust around the rolling pin and gently lift the crust into the pie plate, being careful to get it centered over the plate and not stretch the dough. Once it is in place, unroll the crust from the rolling pin.
See Single Crust. |
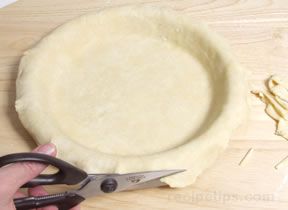
- Gently press the crust against the bottom and sides of the pie plate and trim the overhang to about 1/2 inch. Place the pie plate with the crust in the refrigerator while preparing the filling and rolling the top crust. If saving the trimmings for decorating the pie, wrap them in plastic and refrigerate until ready to use.
|
|
|
- Prepare the filling and then remove the remaining ball of dough from the refrigerator and roll out in the same manner as the first. Make this crust approximately 10 inches round.
|
|
Note:
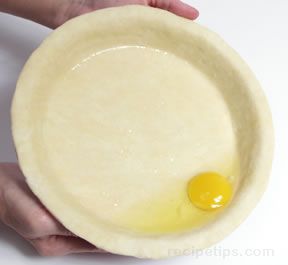
- When using a moist filling, it can cause the crust to become soggy. To prevent crust from becoming soggy, coat the bottom with egg white by placing a whole egg in the bottom of the crust. Carefully swirl the egg around to coat the bottom and sides of the crust. Pour out the remaining egg white and yolk when bottom and sides are well coated.
|
 |
|
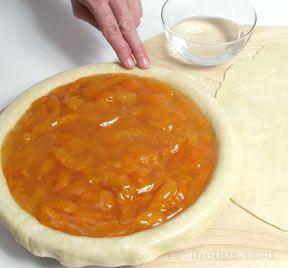
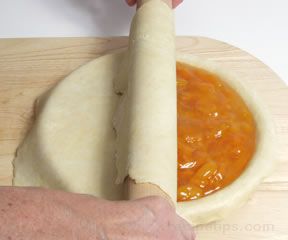
- Fill the chilled bottom crust with the filling and then moisten the edge of the crust with water.
|
|
- Then center the top crust over the filled bottom crust.
|
|
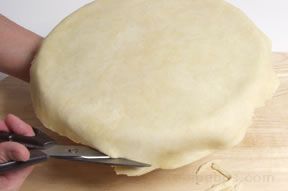
- Trim the overhang to be slightly longer than the overhang of the bottom crust.
|
|
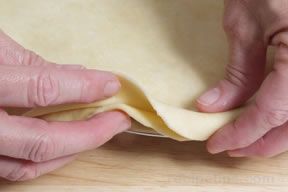
- Fold the overhang under so that the top crust folds slightly over the bottom crust. Fold both crust under so they are flush with the rim of the pie plate.
|
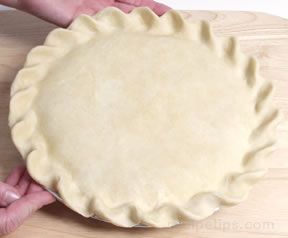
- Flute the edge or press with a fork to seal the crusts. If you prefer a thinner edge to your crust, leave less overhang on the top and bottom crust when trimming.
|
|
|
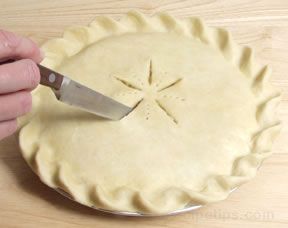
- Make slits with a knife or poke holes with a fork in the top crust to allow steam to escape while the pie bakes.
|
|
|
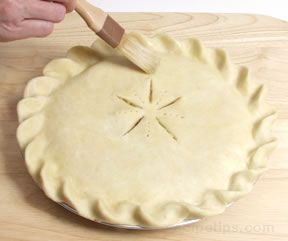
- To create a more attractive crust, brush with egg whites to glaze it.
- Bake as instructed by the recipe.
|
|
 |
Crumb Crust
Ingredients:
1 1/2 cups graham-cracker crumbs (approximately 18 graham cracker squares)
1/4 cup sugar
1/3 cup melted butter or margarine |
Crumb crust is an alternative to the traditional single pie crust. The crumb crust can be made from a variety of cookies or crackers. Crumb crusts can be made from graham crackers, chocolate or vanilla wafers, sandwich cookies, and gingersnaps. The flavor of the crust can be enhanced by adding pecans, almonds, and other nuts. Spices, such as ginger, cinnamon, and nutmeg can also be added. See the instructions below on how to make a crumb crust.
Blind Baking
Blind baking is when the crust is baked without any filling. The crust is partial or completely baked before the filling is added to prevent the crust from becoming soggy. Prepare the single crust as instructed above and the follow the instructions for blind baking below.
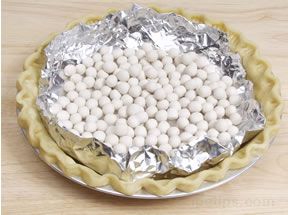
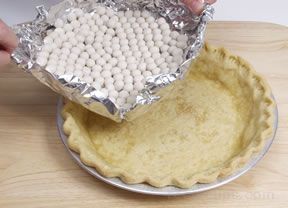
- After the prepared crust has been chilled for 30 minutes, remove it from the refrigerator and line it with foil or parchment paper and weight it down with pie weights, uncooked rice, or dry beans.
|
|
|
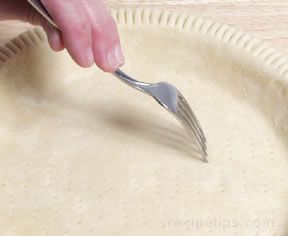
- You can also help prevent the crust from puffing up and blistering while it bakes by pricking it with a fork. Thoroughly prick the bottom and sides of the crust before baking. If a single crust is not going to be blind baked before filling, do not prick the crust because the filling may seep under the crust while it is baking.
|
|
|
- Bake at 350° F until the top edges just begin to turn color. Take the pie crust from the oven and remove the weights and then return the crust to the oven to finish baking.
|
|
|
|
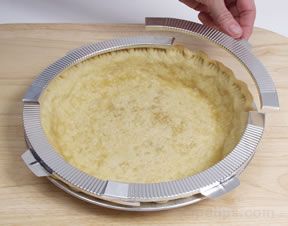
- If the edges of the pie crust start to brown too quickly, cover them with pie crust shields to prevent over browning. If you do not have pie crust shields, you can make some out of aluminum foil.
|
|
|
|
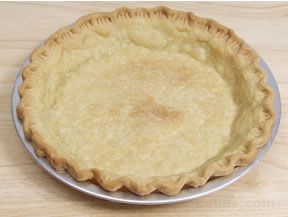
- Bake until the crust is light golden brown.
|
|
|
 |
Decorative Tops
Double crust pies offer an opportunity to decorate more than the edge trim of the pie. Decorating options include anything from simply decorative slits for venting to elaborate sculptured additions made from additional crust cut outs. Pies can also be made to look more attractive by coating the top crust using one of the following effects:
- Brush lightly with milk or cream to give the pie a richer color.
- Brush with egg whites to glaze the crust.
- Sprinkle lightly with sugar to give the crust a sparkle and add crispness.
Some common decorative pie toppings that are used are lattice tops, diamond tops, and spiral tops. Shown below are instructions on how to accomplish the decorative tops.
Lattice Top
|
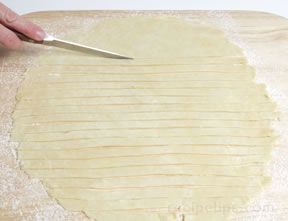
- Prepare the bottom crust as shown above in the double pie crust instructions. Roll out the top crust and cut into ½ inch strips.
|
|
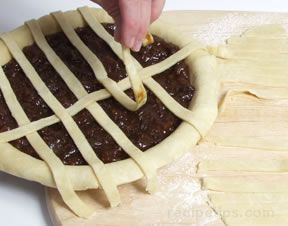
- Place the filing in the bottom crust and then place approximately 6 strips across the top of the filling.
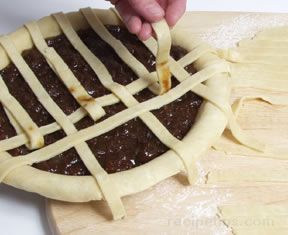
- To weave the cross strips into these strips, fold back every other strip about half ways back on the pie. Place a strip across the strips that are not folded back and then unfold the folded strips.
|
|
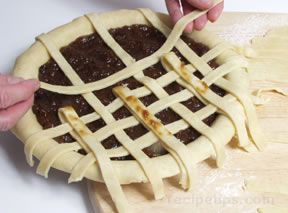
- Fold back the strips that were left unfolded before and place another strip across the strips that are not folded back.
- Unfold the strips and continue on in this manner, alternating the folded strips.
|
|
- Repeat the same procedure on the other half of the pie.
|
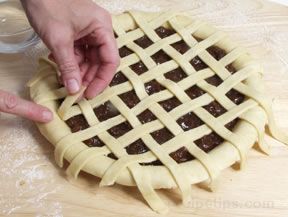
- Lift each strip and moisten the edge of the crust in that area with water and then press the strip back down to seal it.
|
|
|
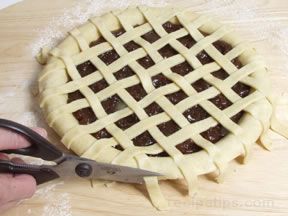
- When the strips are all placed across the filling, trim the ends 1/8 inch shorter than the overhang of the bottom crust.
|
|
|
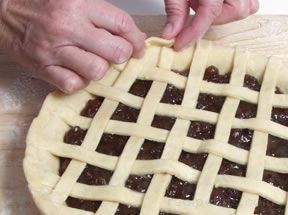
- Moisten the entire edge of the crust and then turn the overhang from the bottom crust up over the ends of the strips so the edge of the crust is flush with the edge of the pie plate.
|
|
|
- Seal the bottom crust and strips by fluting the edges in a desired manner.
- Bake as instructed by the recipe.
|
|
 |
Diamond Top
- Prepare the top in the same manner as the lattice top, only instead of placing the second set of strips perpendicular to the first strips, place them diagonally to the first strips. Placing the strips diagonally instead of perpendicular will form a diamond pattern rather than the squares.
- Seal the edges as shown above on the lattice top.
Spiral Top
- Prepare the bottom crust as shown above in the double pie crust instructions and trim edges flush with the rim of the pie plate. Roll out the top crust in a long narrow strip. Cut the crust into long strips that are 3/8 to 1/2 inch wide.
|
|
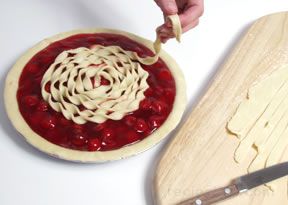
- Place the filling in the bottom crust. Starting with one strip in the center of the pie, begin to twist the strip and coil it around the center of the pie. Continue to twist the strip as you coil it around or it will begin to untwist. Work out towards the edge of the pie. Continue adding strips in one continuous length by moistening the ends of each strip and pressing together to attach to the previous strip.
|

|
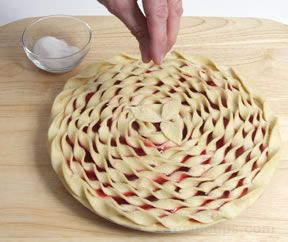
- Continue adding strips and coiling out towards the edge until the entire pie is covered. Work carefully so that you do not let the strips touch the filling until you are putting them into place. This will prevent getting filling on the strips in locations you do not want. Moisten the edge of the pie with water and then place a slightly wider strip tightly twisted around the edge. Press to seal.
|
|
- Sprinkle the crust lightly with sugar to give it sparkle and to add crispness.
- Bake as instructed by the recipe.
|
Meringue Top
Meringue is an alternative to crust for topping a pie. It covers the pie filling in the same manner as the top crust of a pie and it adds it's own flavor to the pie.
- Separate 3 eggs whites from the yolks when the eggs are still cold. Then allow the egg whites to become room temperature before starting to beat them.
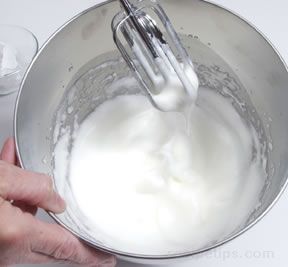
- When eggs whites are room temperature, begin by whipping the whites to a soft peak.
|
|
|
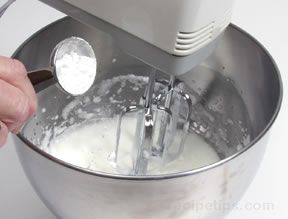
- Add a pinch of salt and 6 tablespoons of powdered sugar. Add sugar gradually, 1 or 2 tablespoons at a time while beating continuously.
|
|
|
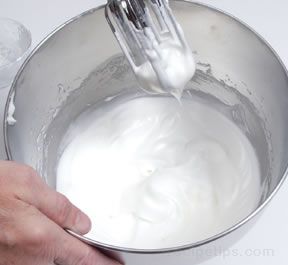
- Beat until sugar is dissolved and meringue appears glossy and forms stiff peaks.
|
|
|
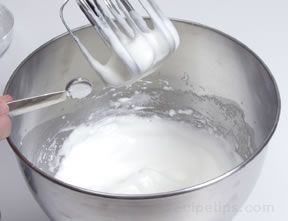
- Add ¼ tsp. of cream of tartar and beat just enough to mix thoroughly. Do not over beat.
|
|
|
- To check to see if the sugar is completely dissolved, rub a little of the meringue between your fingers. If sugar is dissolved it will feel smooth and not be gritty.
|
|
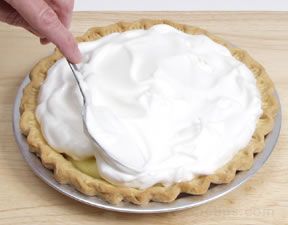
- Spread the meringue over the top of hot pie filling, making sure it is spread so that it is touching the crust around all the edges.
|
|
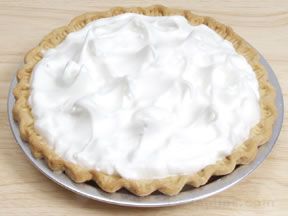
- With the back of the spoon, swirl the meringue and pull up to form decorative peaks in the meringue.
|
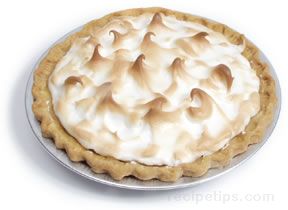 |
- Bake the meringue at 350° F for approximately 15 minutes or until it is lightly browned. Watch carefully so that it does not brown too quickly.
|
Decorative Edges
There are many creative ways in which the edges of a pie can be finished. Shown below are some common ways to trim the edge of a pie, but don't hesitate to use your imagination.
Fluted Pinched Edge
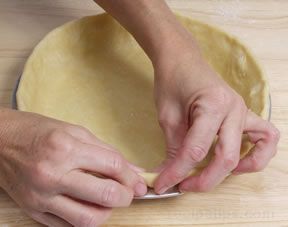
- Trim crust overhang to 1 inch. Fold overhang under and pinch to make the edge stand up.
|
|
|
- With the thumb and index finger of one hand, pinch the outside edge of the crust while pressing from the inside with the index finger on the other hand.
- Repeat the fluting at ½" intervals around the entire edge of the crust.
|
|
 |
Scalloped Edge
- Trim crust overhang to 1 inch. Fold overhang under and pinch to make the edge stand up.
|
|

|
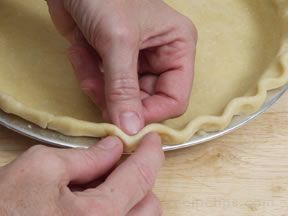
- With the thumb and index finger of one hand, loosely pinch the inside edge of the crust while pressing from the outside with the index finger on the other hand.
- Repeat the fluting at approximately 1-inch intervals around the entire crust to produce a scalloped edge
|
|
 |
Scalloped Forked Edge
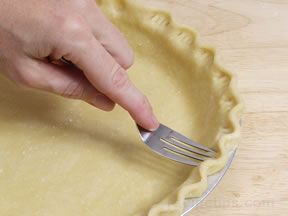
- Create a scalloped edge according to the instructions above.
- After the scalloped edge is finished press a fork in the center of each scallop for additional decoration.
|
|
 |
Pressed Rope Edge

|
- Trim crust overhang to 1 inch. Fold overhang under and pinch to make the edge stand up.
|
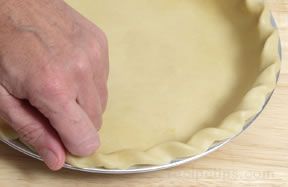 |
- Press the side of your thumb, at an angle, into the dough along the edge of the pie plate. Pinch the dough between the thumb and knuckle of the index finger. Then place the thumb in the imprint made by the index finger and pinch again in the same manner.
- Continue to pinch the dough around the edge of the pie plate by placing the thumb in the imprint of the index finger each time.
|
Imprinted Scalloped Edge
|
- Trim crust flush with the edge of the pie plate. If using a glass pie plate, trim crust overhang to about 1/8 inch past the outer rim to allow for slight shrinkage.
|
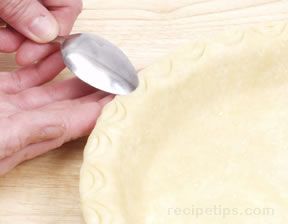 |
- Using an inverted spoon make a scalloped imprint the depth of the rim around the entire edge of the pie plate. When pressing the spoon in the crust to make the imprint, be careful that you do not cut all the way through crust.
- Make a second imprint inside the first imprint. The second imprint should be about ½ the depth of the first. Continue around the entire edge of the crust.
|
Forked Edge (Full & Partial)

|
- Trim crust flush with the edge of the pie plate. If using a glass pie plate, trim crust overhang to about 1/8 inch past the outer rim to allow for slight shrinkage.
|
|
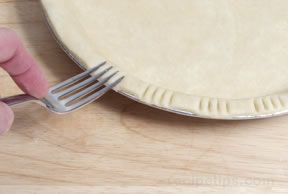
- Using the tines of a lightly floured fork, press the edge of the crust to the rim of the pie plate.
- Partial imprinted edge - Imprint around the edge of the crust, making fork imprints at 3/4-inch intervals.
|
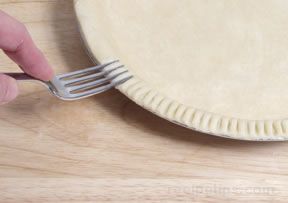 |
- Full imprinted edge - Continue around the entire edge of the crust, making the fork imprints evenly spaced.
|
Checkerboard Edge
- Trim crust flush with the edge of the pie plate. If using a glass pie plate, trim crust overhang to about 1/8 inch past the outer rim to allow for slight shrinkage.
|
|

|
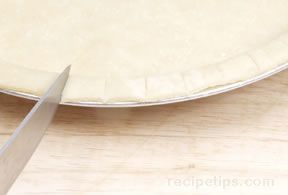
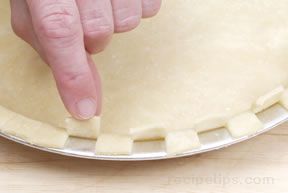
- Make cuts through the dough all around the rim of the pie plate at approximately ½ inch intervals.
|
|
|
- Lift every other square up and inward to form a checkerboard pattern around the rim.
|
|
 |
Leaf Edge
- Use a double crust recipe, roll out first crust, and place it in a pie plate. Trim crust flush with the edge of the pie plate. If using a glass pie plate, trim crust overhang to about 1/8 inch past the outer rim to allow for slight shrinkage.
|
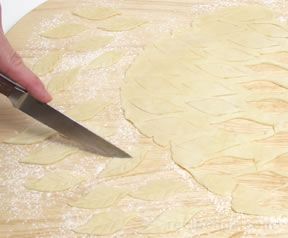
- Roll out the remaining dough to 1/8-inch thickness. Cut out approximately 25 leaf shapes that are slightly longer than 2 inches and wider than ½". Use a paring knife to cut out the shapes or a cookie cutter can be used if you have one that is the appropriate size.
- Make veins in the leaves using a paring knife or some other small knife. Be careful not to cut through the crust. It may be helpful to use the dull side of the knife.
|
|
|
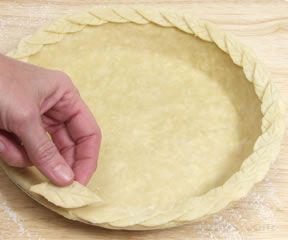
- Moisten the rim of the pie crust with water. Apply the leaves by pressing them on the moistened rim, slightly overlapping each one.
|
|
|
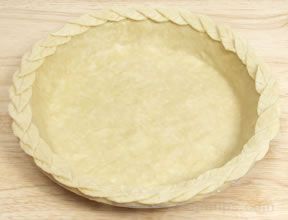
- Apply leaves until the entire rim is covered.
- Patterns other than leaves can also be used to decorate the rim of the pie crust. Be careful in selecting a pattern that you do not choose one that is too large.
|
|
 |
Braided Edge

|
- Use a double crust recipe, roll out first crust, and place it in a pie plate. Trim crust flush with the edge of the pie plate. If using a glass pie plate, trim crust overhang to about 1/8 inch past the outer rim to allow for slight shrinkage.
|
|
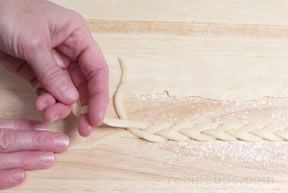
- Roll out remaining dough in a narrow long strip that is 1/8 inch thick and cut at least six long strips 1/4 inch wide. Place 3 of the strips on a lightly floured surface and begin to braid them together.
|
|
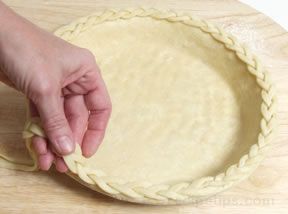
- Braid the strips until the braid is long enough to fit all around the edge of the pie crust. If the braid needs more length, moisten the ends of the braided dough and attach 3 more strips of dough. Moisten the edges of the crust and carefully place the braid around the rim.
|
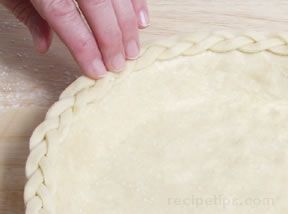 |
- Place the braid around the entire crust. Press braid lightly to the rim of the crust to hold it in place.
|
Tips
The following tips may assist in a more successful pie making experience.
Minimize Pie Crust Shrinkage:
- Use a dull metal or unglazed ceramic pie plate. Avoid using glass. If you have to use a glass pie plate, allow a 1/8-inch overhang to compensate for shrinkage.
- Nonstick pie pans can cause excessive shrinkage.
- Bake at a lower temperature, such as 350° F.
- Do not over-handle the dough when mixing and rolling.
- Do not stretch the dough when placing it in the pie plate.
- Be sure to chill the crust sufficiently before baking.
Avoid Tough Crust:
- When adding water in with the flour and fat mixture, be sure to mix gently and do not mix more than necessary.
- Be sure to add ice water and do not use more water than is necessary.
- Handle the dough as little as possible.
- Adding sugar or a small amount of vinegar to the dough will result in a more tender crust.
Flaky Crust:
- Be sure the shortening or butter (or margarine) is chilled properly when mixing with the flour.
- Work quickly so the fat remains firm.
- Keep dough cool while preparing.
- Be sure to chill the crust sufficiently before baking.
- Using shortening or lard instead of butter (or margarine) will result in a flakier crust.
Prevent Soggy Crust:
- If using a moist filling, blind bake the crust before adding the filling to keep crust crisp.
- For moist fillings, coat bottom crust with egg white to prevent crust from becoming soggy. See sample.
- To prevent soggy double crust pies, be sure to make slits in the top crust so the steam can escape as the pie is baking. See sample.
- Bake double crust pies in bottom third of the oven so the bottom crust cooks enough to prevent sogginess and so that the top crust does not brown too quickly.
Miscellaneous Tips:
- Use a mixture of fat for best color, flavor and flakiness. Use butter (or margarine) for color and flavor with a mixture of shortening for flakiness.
- To prevent a mess in the oven, place the pie plate on a layer of foil or on a cookie sheet. If the filling overflows while baking, the foil or cookie sheet will catch the drips.
- Kitchen shears work best to trim overhang on pie crust.
- If the edges of the pie crust start to brown too quickly, cover them with pie crust shields to prevent over browning. If you do not have pie crust shields, you can make some out of aluminum foil. See sample.
|

