Preparation Guide
Thawing | Trimming, Cutting, and Boning
Tenderizing | Aging | Tying | Grinding
Thawing
Frozen beef should not be defrosted at room temperature. Harmful bacteria may grow rapidly under such conditions. The best method for thawing beef (or any other type of meat) is to place it in the refrigerator where it will defrost slowly and safely. A large cut of beef may require 2 days to defrost in the refrigerator. The meat should be placed on a plate or dish (to catch any juices that may drip from the thawing meat) and stored on the lowest shelf of the refrigerator.
If it is not practical to wait for beef to thaw in the refrigerator, it is possible to defrost the meat in a microwave oven using the proper defrost setting, but this is definitely not recommended. Some microwave ovens may not defrost the meat evenly, which may allow some portions to become fully thawed while other areas may still be frozen. While waiting for the frozen areas to defrost, harmful bacteria may grow rapidly in the thawed areas of the meat. It is best to use small cuts or pieces of beef, which are safer to defrost with this method than large cuts. Never use a normal cooking setting to defrost the meat. Beef cuts should be cooked promptly (within a few minutes) after defrosting in the microwave and ground beef must be cooked immediately after thawing. Microwave defrosting should be used only if necessary and should not be the thawing method of choice.
Approximate Defrosting Times
(Refrigerator Method) |
| Steak, 1" thick |
12 hours |
| Steak, thicker than 1" |
Up to 24 hours |
| Pot Roast, thin |
3 to 5 hours per pound |
| Pot Roast, thick |
4 to 7 hours per pound |
| Oven Roast, small |
Up to 5 hours per pound |
| Oven Roast, large |
Up to 7 hours per pound |
| Ground Beef, 1 pound bulk |
24 hours |
| Ground Beef Patties, ½" thick |
12 hours |
| Note: Beef that is not fully defrosted should not be cooked because the exterior of the beef may become overdone before the interior has had a chance to cook to the proper temperature. |
|
Note: When thawing beef, it is easier to cut it into pieces for stew meat or kabobs before it is fully defrosted. After cutting, the beef can then be refrigerated until it has fully thawed.
Fresh raw beef, which has not been frozen, can be cut easily if it is placed in the freezer for a few minutes to firm it up. |
Trimming, Cutting, and Boning
Many cuts of beef purchased at a food store or specialty meat market are ready to cook, but some cuts may need additional trimming or boning before they can be cooked. If extra calories and saturated fat are an issue, then it is best to remove as much external fat as possible. However, removing the external fat before cooking can result in beef that is a bit tough because the fat acts as a natural tenderizer during the cooking process and seals in some of the juices.
|
Rib Roasts |
- Boning: It may be beneficial to remove the backbone (also known as the chine bone) from very large rib roasts. This will make the rib roast easier to carve after it is cooked. A meat saw or sharp knife will work well for removing the chine bone. The boneless rib roast can then be rolled and tied before it is roasted. A rib roast with the rib bones intact is called a standing rib roast because the roast stands on the rib side of the meat as it roasts. It is more popular than the boneless roast.
|
- Frenching: A form of trimming called frenching refers to the process of scraping the fat and gristle from the ends of rib bones using a sharp knife. When preparing beef cuts such as a standing rib roast, the process makes the beef more decorative when it is served. The bone ends should be wrapped with foil or decorative foil coverings, known as frills, in order to prevent the bone ends from burning during the roasting process.
|
|
Trimming a Tenderloin |
|
If you plan on roasting a beef tenderloin, you can save money by purchasing an untrimmed tenderloin and performing the trimming at home. A tenderloin that is not trimmed of the outer fat layers may weigh as much as 9 pounds. It may weigh as much as 5 pounds when it is trimmed.
Using a sharp knife, remove the layers of outer fat from the tenderloin. The layers should pull away easily after a knife has been inserted between the fat and the meat. The silverskin, which is a tough, silver colored membrane should also be completely removed. If it is not removed, it tends to shrink during cooking, which causes uneven roasting.
|
|
Preparing Steaks for Grilling or Broiling
If a steak has a thick layer of fat on the outside edges, it can be trimmed off so that only about 1/8" of fat remains. A little bit of fat around the edges helps to seal in the juices and keeps the edges from drying out when the meat is grilled or broiled. |
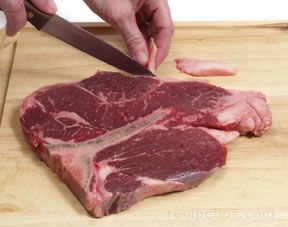 |
| This thin layer of remaining fat should be vertically slashed at about 1" intervals all the way around the steak so that the meat will not curl up while it is cooking. |
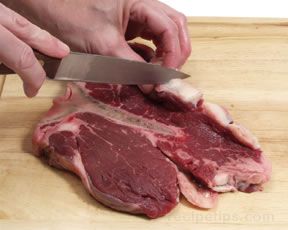
|
|
Cut and Trim Beef Yourself and Save Money
You can save money by purchasing larger portions of beef and then cutting them into smaller cuts at home. Larger cuts of beef often cost less per pound because less preparation is required from the butcher. Steaks can be obtained from roasts, beef strips can be trimmed from larger pieces for stir-fry recipes, and chunks of beef can be cut and used as kabobs or stew meat. The pieces are easier to cut if the beef is placed in the freezer for a few minutes to firm it up. |
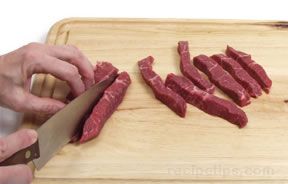 |
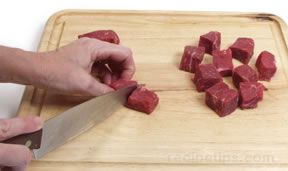 |
Tenderizing
Tenderizing makes it possible to purchase less costly beef cuts and still enjoy the tenderness that is usually found only in the more expensive cuts. Tenderizing methods allow some of the tougher cuts of beef to be cooked with high heat methods such as grilling and broiling, which are usually reserved for tender cuts. Described below are some of the most commonly used methods for tenderizing beef.
|
Pounding
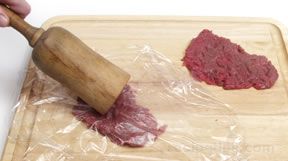
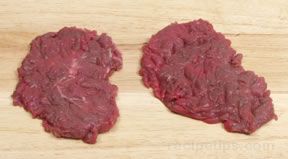
Tougher cuts of beef can be tenderized by pounding thin slices into even thinner slices, using a meat mallet. The pounding action flattens the meat and breaks up some of the fibers and connective tissues, making the beef a bit more tender. Cooking the tenderized beef rapidly with high heat cooking methods is an important factor in keeping the meat tender. The flattened beef slices may be broiled, grilled, or sautéed, which provide excellent results. |
 |
 |
|
Commercial Powders
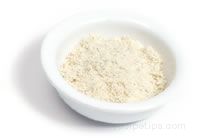
A powdered meat tenderizer can be purchased and sprinkled on tougher cuts of beef. The tenderizing powders contain enzymes that help break down the tougher fibers of the meat. The enzymes are often produced from pineapple and papaya extracts. |
 |
|
Marinating
Another option for tenderizing beef is with the use of a marinade. Soaking various cuts of beef in a marinade is a good method for adding flavor as well as to help tenderize the meat.
A proper marinade should contain an acidic ingredient such as vinegar or wine, oil such as olive oil, and seasonings such as herbs and spices. Citrus fruit juices may be used in place of the vinegar or wine to provide the acidic ingredient that is necessary to soften the tissues of the meat.
There are several important points to remember when using a marinade:
- Quantity: The marinade should totally cover the meat in order for it to work effectively.
- Soaking Time: When using tender cuts of beef, a soaking time of 2 hours or less is all that is required because the marinade is used basically to flavor the meat. Tougher cuts of beef should be soaked in the marinade for several hours or overnight in order to tenderize the meat as well as flavor it.
- Refrigeration: Always marinate beef in the refrigerator.
- Proper Containers: Since the marinade contains an acidic ingredient, reactive containers such as metal bowls should not be used. It is best to use containers such as glass or plastic bowls or plastic bags that can be sealed.
- Reuse: The marinade should not be reused for any other purpose because of the bacteria that may be present from having been in contact with the raw meat. The only way the marinade can be reused is to boil it thoroughly to be used as a basting liquid or as part of a sauce for the meat.
|
|
Rubs
An additional option for tenderizing beef, as well as adding flavor to it, is with the use of a rub. A dry mix of herbs and spices are applied to the raw beef and are allowed to permeate and flavor the meat over a period of time, usually overnight in the refrigerator. An endless variety of rubs can be prepared for beef depending on the types of flavors that you want to add to the meat.
- Application: A rub mixture can be rubbed onto the meat, but the moisture from the meat can cause the dry ingredients to stick to your hands. The best results often occur when the ingredients are sprinkled evenly on all sides.
- Ingredients: Some of the ingredients that may be used for a dry rub include black pepper, cumin, chili powder, crushed red pepper, celery seed, garlic powder or fresh crushed or minced garlic, salt, and brown sugar.
- Paste Rub: A small amount of liquid may be added to the mixture in order to create a dry paste, which may be preferred in some cases. Some of the liquids that are often used are vinegar, cider vinegar, wine, or fruit juice.
- Sugar Usage: Use sugar sparingly because it will melt and burn during the cooking process, especially if the beef is grilled or broiled. Too much of the burnt sugar will provide unpleasant results. Only a small amount of sugar is necessary to provide adequate flavor.
- Results: Both the dry rub and the paste will form a flavorful crust when the beef is cooked. Rubs are most often used with beef ribs that will be grilled or barbecued, but they can be used with almost any cut of beef.
|
|
Barding
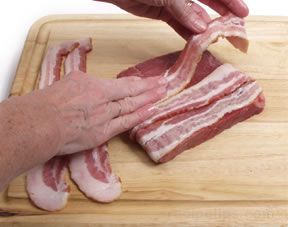
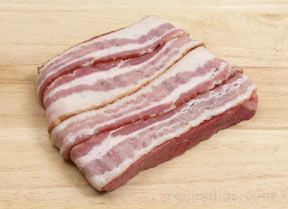
Barding consists of wrapping thin layers of beef fat or bacon around cuts of beef. Some of the fat melts during the roasting process, which adds moisture and flavor to the meat and serves as a natural tenderizer. The remaining fat can be removed after the meat is cooked.
If you plan to roast a lean, tough cut of beef rather than braise it, then barding may be beneficial. Lean cuts of beef, such as cuts from the round, are often tough because of the lack of internal fat, known as marbling, and because the muscles are responsible for locomotion of the animal. The more a muscle is used, the less tender it is. Suspension muscles from the center of the animal, such as in the rib and loin area, are very tender because they do not move as much as muscles in the front or rear portions of the animal. As a result, beef cuts from the loin and rib never require barding. |
 |
 |
Aging
Beef can be aged so that the flavor and tenderness are enhanced. As the beef ages, enzymes in the meat are released which help to soften the tough, connective tissues. The aging process must be performed under carefully monitored conditions by a professional and should not be tried at home. Aged beef should not be confused with old beef, which refers to beef that has come to the end of its shelf life.
- Dry Aging: Beef that is dry-aged is allowed to hang unwrapped for a period of time under controlled humidity, temperature, and airflow in a professional grade refrigerator. The meat loses a large quantity of moisture, which concentrates the flavor, reduces the original weight by nearly a fifth, and tenderizes the meat. Only the best cuts of beef graded Prime or Choice are aged in this manner, so the cost can be quite high.
- Wet Aging: Wet aging is similar to dry aging except that the beef is wrapped while it ages in order to prevent the loss of moisture. It is aged in controlled conditions in a professional refrigerator. Because there is no loss of moisture, the flavor does not become as concentrated as with dry aging.
Tying
Tying various cuts of beef is a good way to hold the shape of a roast, to keep the cut of beef in a compact form, and to make sure that the meat will be cooked evenly. Beef roasts or steaks that have been boned are often rolled and tied before roasting. The tying allows the roast to be stuffed and makes for a more attractive presentation when serving.
It is important to use a natural string of cotton or linen which will not burn during the cooking process or ruin the flavor of the beef. Butcher's string is the best to use because it is a bit heavier than other types of common kitchen string, which makes it easier to handle. When tying a cut of beef, it is important that the string is tight enough so that the desired shape is held in place, but that the string is not so tight that the natural juices will be squeezed from the meat during the cooking process.
|
Tying a Standing Rib Roast
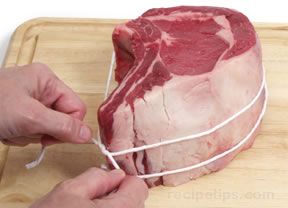
It is usually a good idea to tie a standing beef rib roast so that the outer layers of meat do not pull away from the rib-eye during the roasting process. Using a simple knot, tie pieces of string around the roast so that the string runs between the spaces of each of the rib bones.
Tying the rib roast will make for a more attractive presentation when the roast is served because when the string is removed after cooking, the roast will hold its shape.
|
 |
|
Tying a Beef Tenderloin
In order for the tenderloin to cook properly, the narrow end is usually tucked under so that the entire tenderloin appears to have a consistent diameter across the length of the roast. The tenderloin is then tied with pieces of string at 1½ to 2 inch intervals. |
|
|
|
Tying a Top Blade Chuck Roast
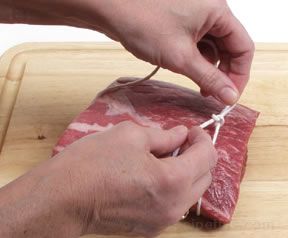
Tying a top blade chuck roast provides better results for pot-roasting. The first step is to wrap a piece of string, which is at least 6 feet in length, around the short circumference near the end of the roast and tie a double knot. |
 |
|
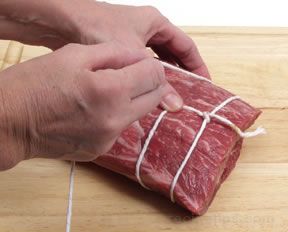
Pull the remaining string down from the knot, approximately 1 to 2 inches (depending on the size of the roast), and hold it in place with your thumb. Loop the remaining string around the short circumference of the roast and back to the string under your thumb. |
 |
|
Run the string under the string beneath your thumb to create a loop and pull the remaining string down from the loop. |
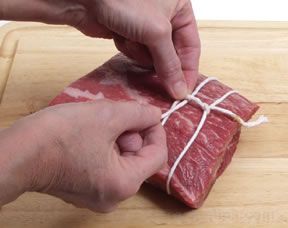 |
|
Once again, place your thumb on the string at a 1 to 2 inch distance from the previous loop and run the string around the roast back to the position of the string beneath your thumb to make another loop. Repeat the process until the entire length of the roast has been tied. |
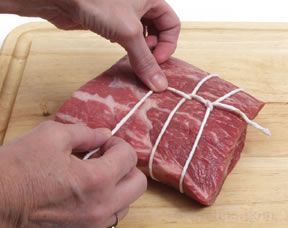 |
|
Roll the roast over and run the string over and around each of the loops on the underside. |
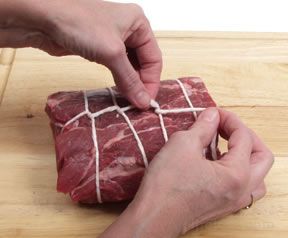 |
|
Wrap the remaining string around the end of the roast and then flip the roast over again to tie the end of the string to the original knot. |
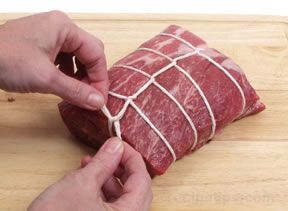 |
Grinding
When purchasing ground beef, it is not always possible to know which beef cuts were used to produce the ground beef unless it is labeled "ground round" or "ground chuck". It is often preferable to purchase the beef cut of your choice and grind it at home, however the beef should not be ground until you are ready to use it because ground meat deteriorates in quality rather quickly. Before the meat is ground, the gristle and tendons should be removed. Several methods for producing ground beef at home are described below.
|
Meat Grinder
A manual grinder can be used to grind meat as coarse or fine as you require. This method produces the most evenly ground meat. Some electric mixers also have attachments for grinding meat.
|
|
Food Processor
A food processor is a convenient tool for chopping or grinding beef. |
 |
|
The beef should be cut into cubes before it is placed into the food processor. |
 |
|
The food processor should be pulsed on and off rather than allowing it to operate continuously. This prevents the beef cubes from becoming over-processed. |
 |
|
The meat should be stirred after several pulses to provide an even grind. |
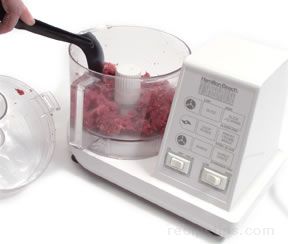 |
|
The food processor will grind the beef quickly so it can be easy to over-process the meat, resulting in ground beef that has a pasty texture. The best results occur when the meat is ground just until the larger chucks are broken down into pieces that are no smaller than ¼ inch. |
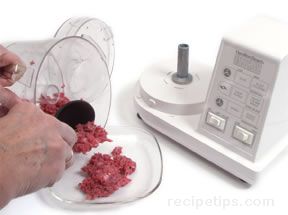
|
|
Hand Chopping
With the use of a sharp knife, beef can be cut into cubes. It can then be cut into smaller pieces until the meat is the consistency that is desired. Hand chopping will provide firmer ground meat than any of the machine methods. |
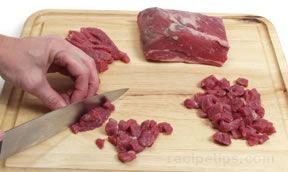 |
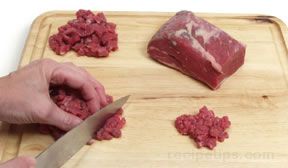 | |


